Discussion:
What would happen if I just bypassed this garden water check valve?
(too old to reply)
Danny D.
2012-11-06 16:03:33 UTC
Permalink
I agree with the prior posts that the backflow preventer is necessary.
OK. I don't disagree. It's there for a reason.
I'm going to try to understand the thing and then repair it.

BTW, I can't tell if it's a 1" or a 1.5 inch opening
because it clearly has a "1" stamped on each opening
but it's just as clearly got a >1" pipe going in and out.

Here, for example, is a ruler next to the pipe and
a yellow circle around the 1.
LARGE: Loading Image...
SMALL: Loading Image...

Notice the pipe is actually about 1 3/8ths in diameter, so it's
neither 1 inch nor 1.5 inch.

Q: What size would you say this Wilkins Zurn 975XL actually fits?
Ralph Mowery
2012-11-06 17:08:56 UTC
Permalink
Post by Danny D.
Notice the pipe is actually about 1 3/8ths in diameter, so it's
neither 1 inch nor 1.5 inch.
You do realize that pipe is not really measured like it is called ?
That is what is called one inch pipe will actually measuer about 1.3 inches
outside diameter with a ruler.


http://www.pipemarkers.com/pipe-data.php

This is a pipe chart for sizes.
Danny D.
2012-11-06 17:12:43 UTC
Permalink
Post by Ralph Mowery
You do realize that pipe is not really measured like it is called ?
I do now!

Thanks.
Krazy Old Man
2014-07-19 10:05:29 UTC
Permalink
Jumping in late but just so you know...

Plumbers are odd folks compared to carpenters. A carpenter wants to know
how big a hole to drill for the pipe to fit through. The plumber measures
the inside diameter to know how much water he can get to flow through it.

I've had many a weekend warrior insist the 1/2" pipe he has in his hand is
really 3/4" and he is right as far as the size hole he needs to drill in the
joist but not as far as what should be on the label of the fittings he
needs. Let's face it, all the labels in my and every other store can not be
wrong so the way you look at it needs to be adjusted.
Post by Danny D.
Post by Ralph Mowery
You do realize that pipe is not really measured like it is called ?
I do now!
Thanks.
t***@optonline.net
2012-11-07 13:01:01 UTC
Permalink
Post by Ralph Mowery
Post by Danny D.
Notice the pipe is actually about 1 3/8ths in diameter, so it's
neither 1 inch nor 1.5 inch.
You do realize that pipe is not really measured like it is called ?
It is measured exactly as it's called, by INSIDE diameter.
Post by Ralph Mowery
That is what is called  one inch pipe will actually measuer about 1.3 inches
outside diameter with a ruler.
http://www.pipemarkers.com/pipe-data.php
This is a pipe chart for sizes.
Ralph Mowery
2012-11-07 15:25:41 UTC
Permalink
Post by t***@optonline.net
Post by Ralph Mowery
You do realize that pipe is not really measured like it is called ?
It is measured exactly as it's called, by INSIDE diameter.
Not EXACTLY.. It depends on the thickness of the pipe. Schedule 40 pipe
is 1.049 inches inside, and sched 80 is .957 inches inside.

Pipe is the same outside diameter so it will all thread together for the
same size. Some pipe has thicker walls than others so the only way to go is
to make the inside diameter smaller.

Again look at the chart.

http://www.pipemarkers.com/pipe-data.php
dadiOH
2012-11-06 18:46:34 UTC
Permalink
Post by Danny D.
I agree with the prior posts that the backflow preventer is
necessary.
OK. I don't disagree. It's there for a reason.
I'm going to try to understand the thing and then repair it.
BTW, I can't tell if it's a 1" or a 1.5 inch opening
because it clearly has a "1" stamped on each opening
but it's just as clearly got a >1" pipe going in and out.
Here, for example, is a ruler next to the pipe and
a yellow circle around the 1.
LARGE: http://www3.picturepush.com/photo/a/11346746/img/11346746.jpg
SMALL: http://www3.picturepush.com/photo/a/11346746/640/11346746.jpg
Wrong place. Measure at the pipe into the check valve. Actually, it
doesn't much matter...get the size check valve necessary - I'd think 1 1/2"
would be very generous - and use pipe fittings as needed to marry it to the
pipe. Do you plan to keep the shutoff valves?
--
dadiOH
____________________________

Winters getting colder? Tired of the rat race?
Maybe just ready for a change? Check it out...
http://www.floridaloghouse.net
Danny D.
2012-11-07 02:05:32 UTC
Permalink
Post by dadiOH
Measure at the pipe into the check valve. Actually, it
doesn't much matter...get the size check valve necessary - I'd think 1 1/2"
would be very generous - and use pipe fittings as needed to marry it to the
pipe. Do you plan to keep the shutoff valves?
I ordered the repair kit - so I'm just waiting for it to arrive.
Danny D.
2012-11-22 04:31:19 UTC
Permalink
SMALL: Loading Image...
LARGE: Loading Image...
What do you find when you clean the valve? (sand, small pebbles,
some other debris)
UPDATE:
Thanks for all your help & advice!
My backflow preventer is now repaired & no longer leaking water.
A 15-step pictorial DIY is attached below.

SUMMARY:
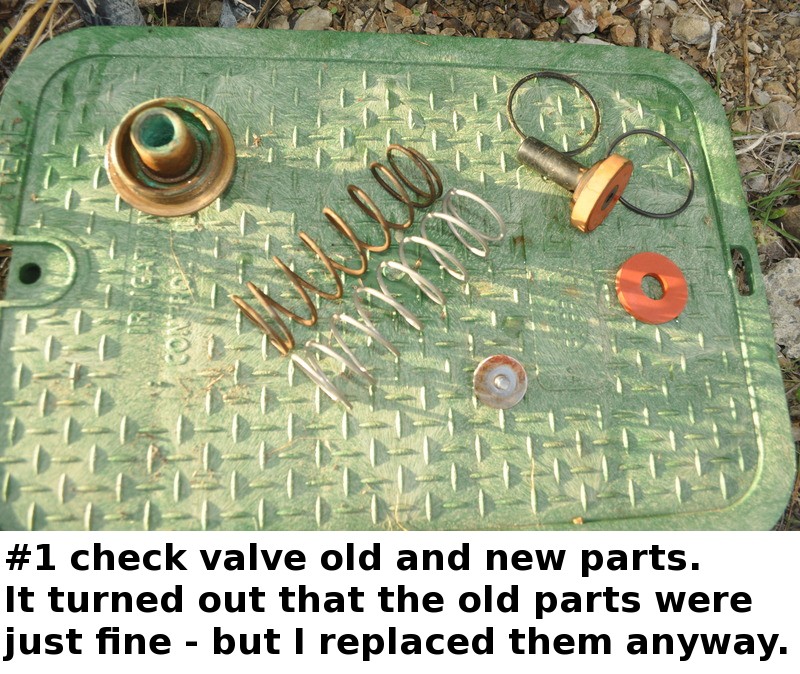
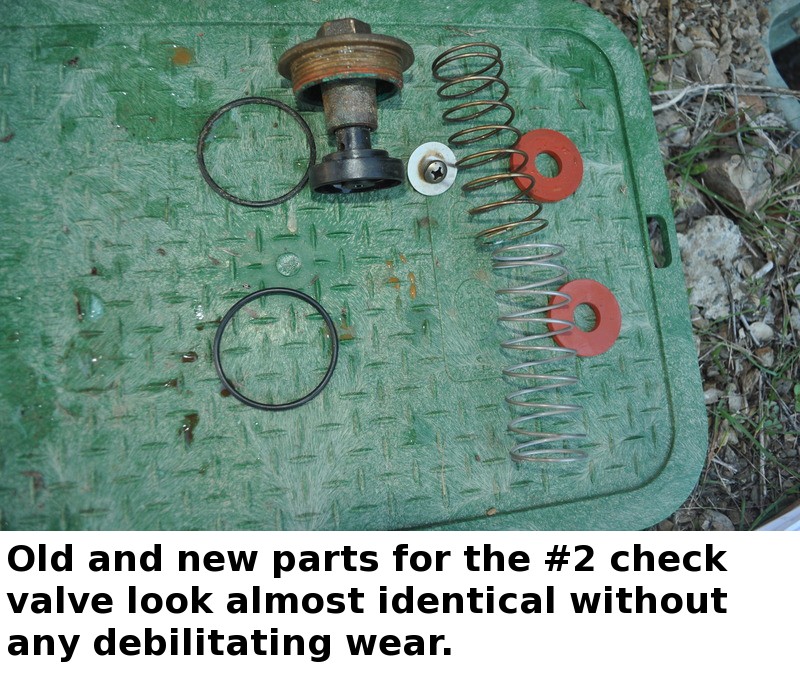
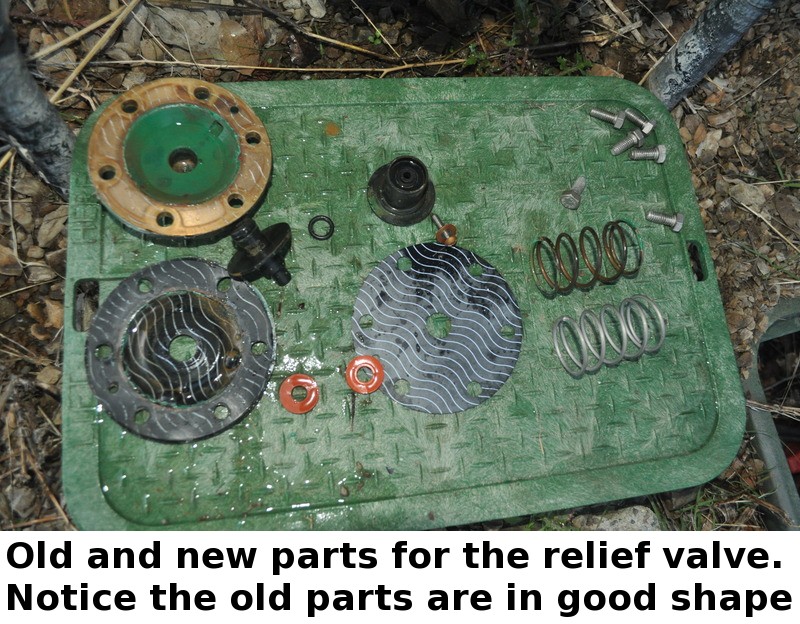
I found all the parts inside the three valves in excellent condition
as you had suggested it would be - but I replaced them all anyway.

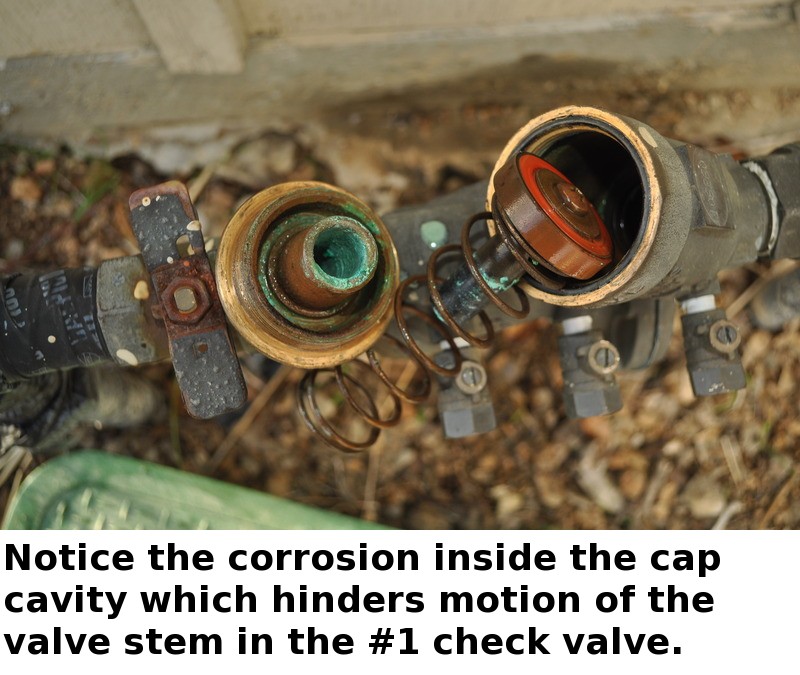
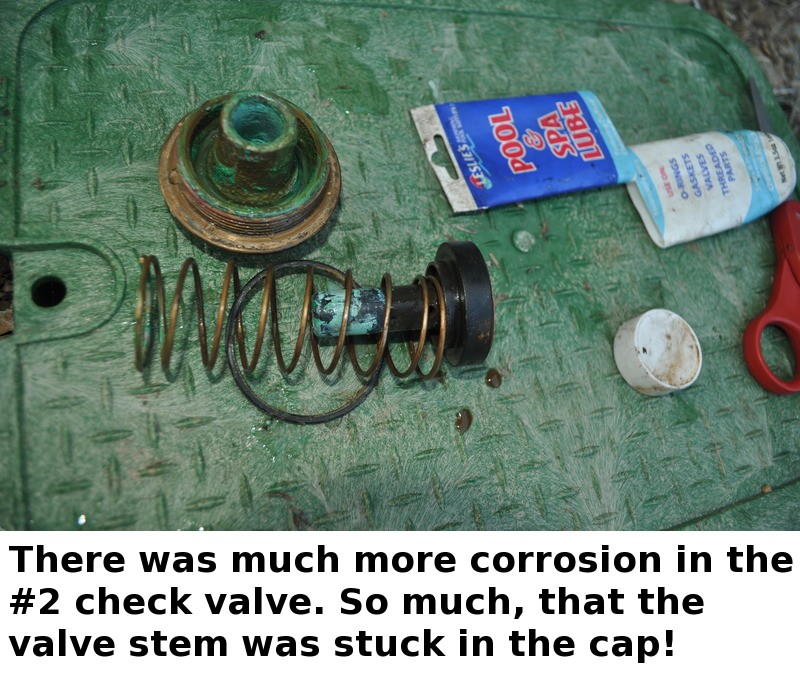
The key problem I saw was the #2 check valve was stuck in place
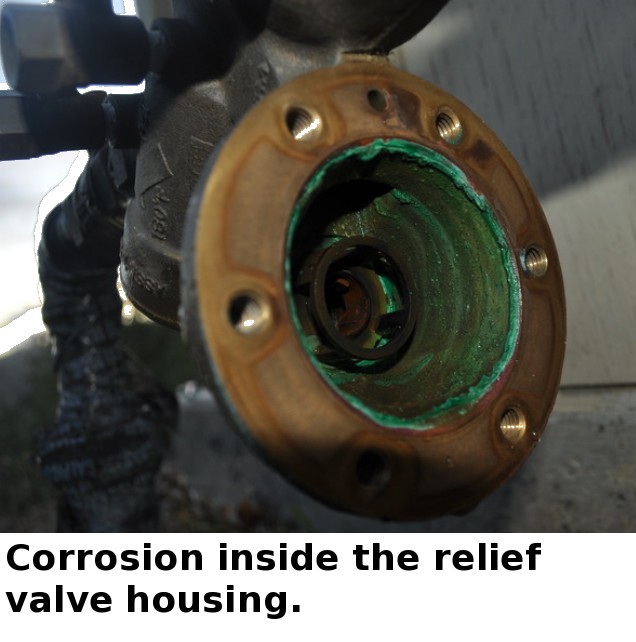
due to light-green corrosion inside the brass cap cavity.

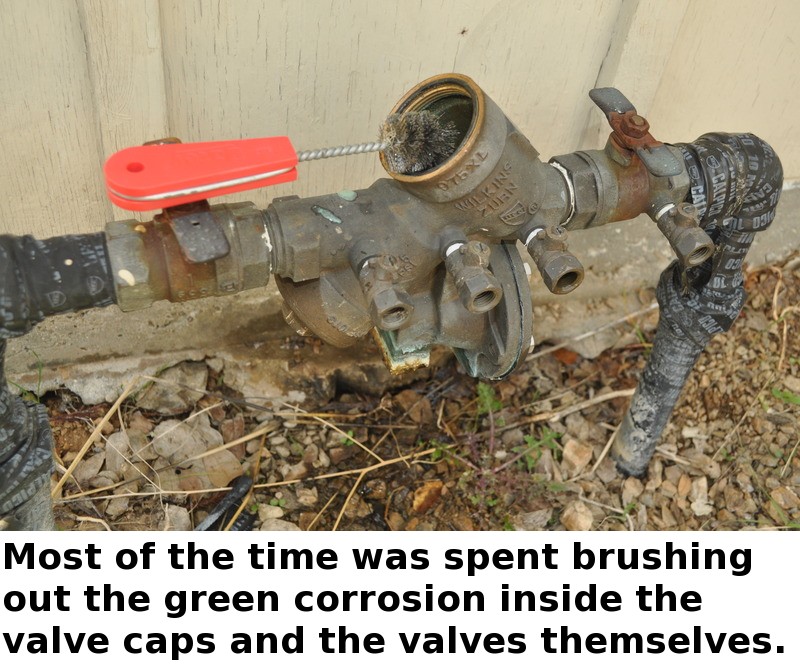
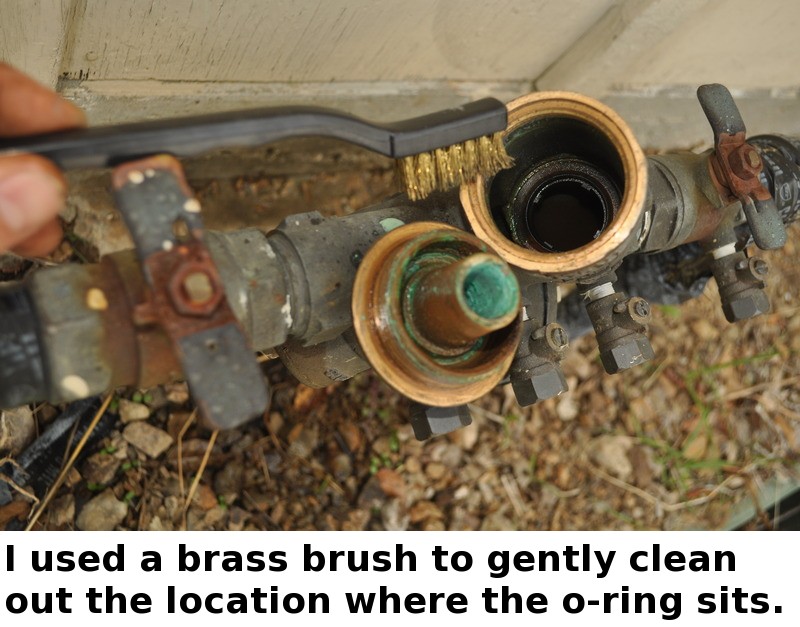
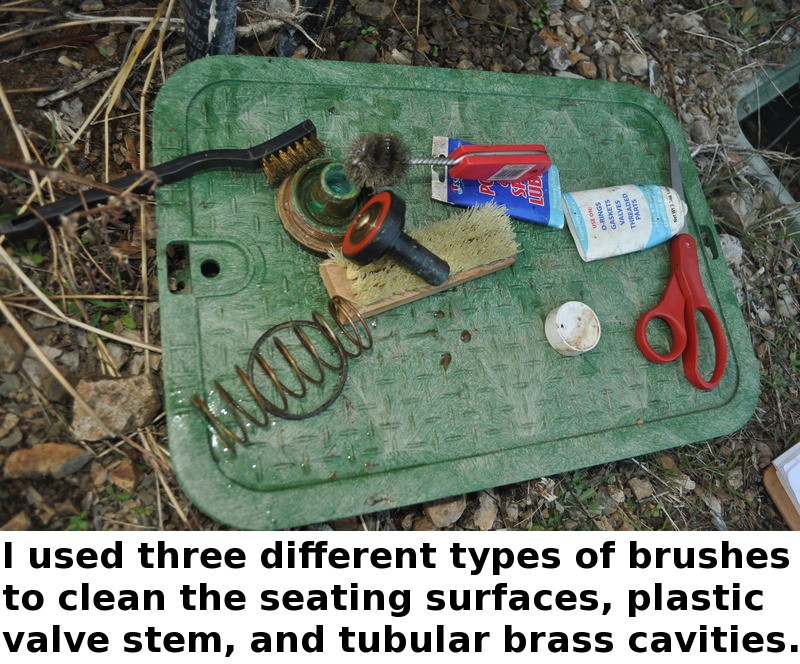
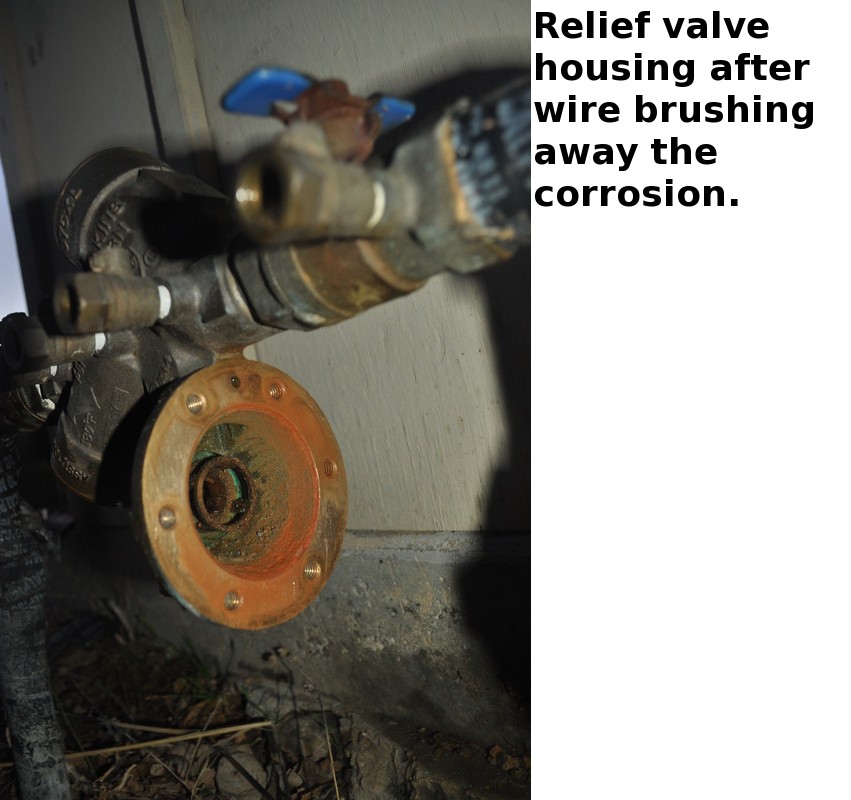
Also there was light-green corrosion in all cavities, which I
painstakingly wire brushed out - as that was the key issue.

On a scale of 1 to 10, this is an easy 1. No surprises. No special
tools. It took me about three hours - one hour for the #1 check
valve on the top inlet, another hour for the #2 check valve on the
bottom outlet, and another hour for the relief valve on the inlet.

It should take you about a half hour in total - maybe 45 minutes,
depending on how well you wish to clean out the green corrosion.
I took my sweet time.

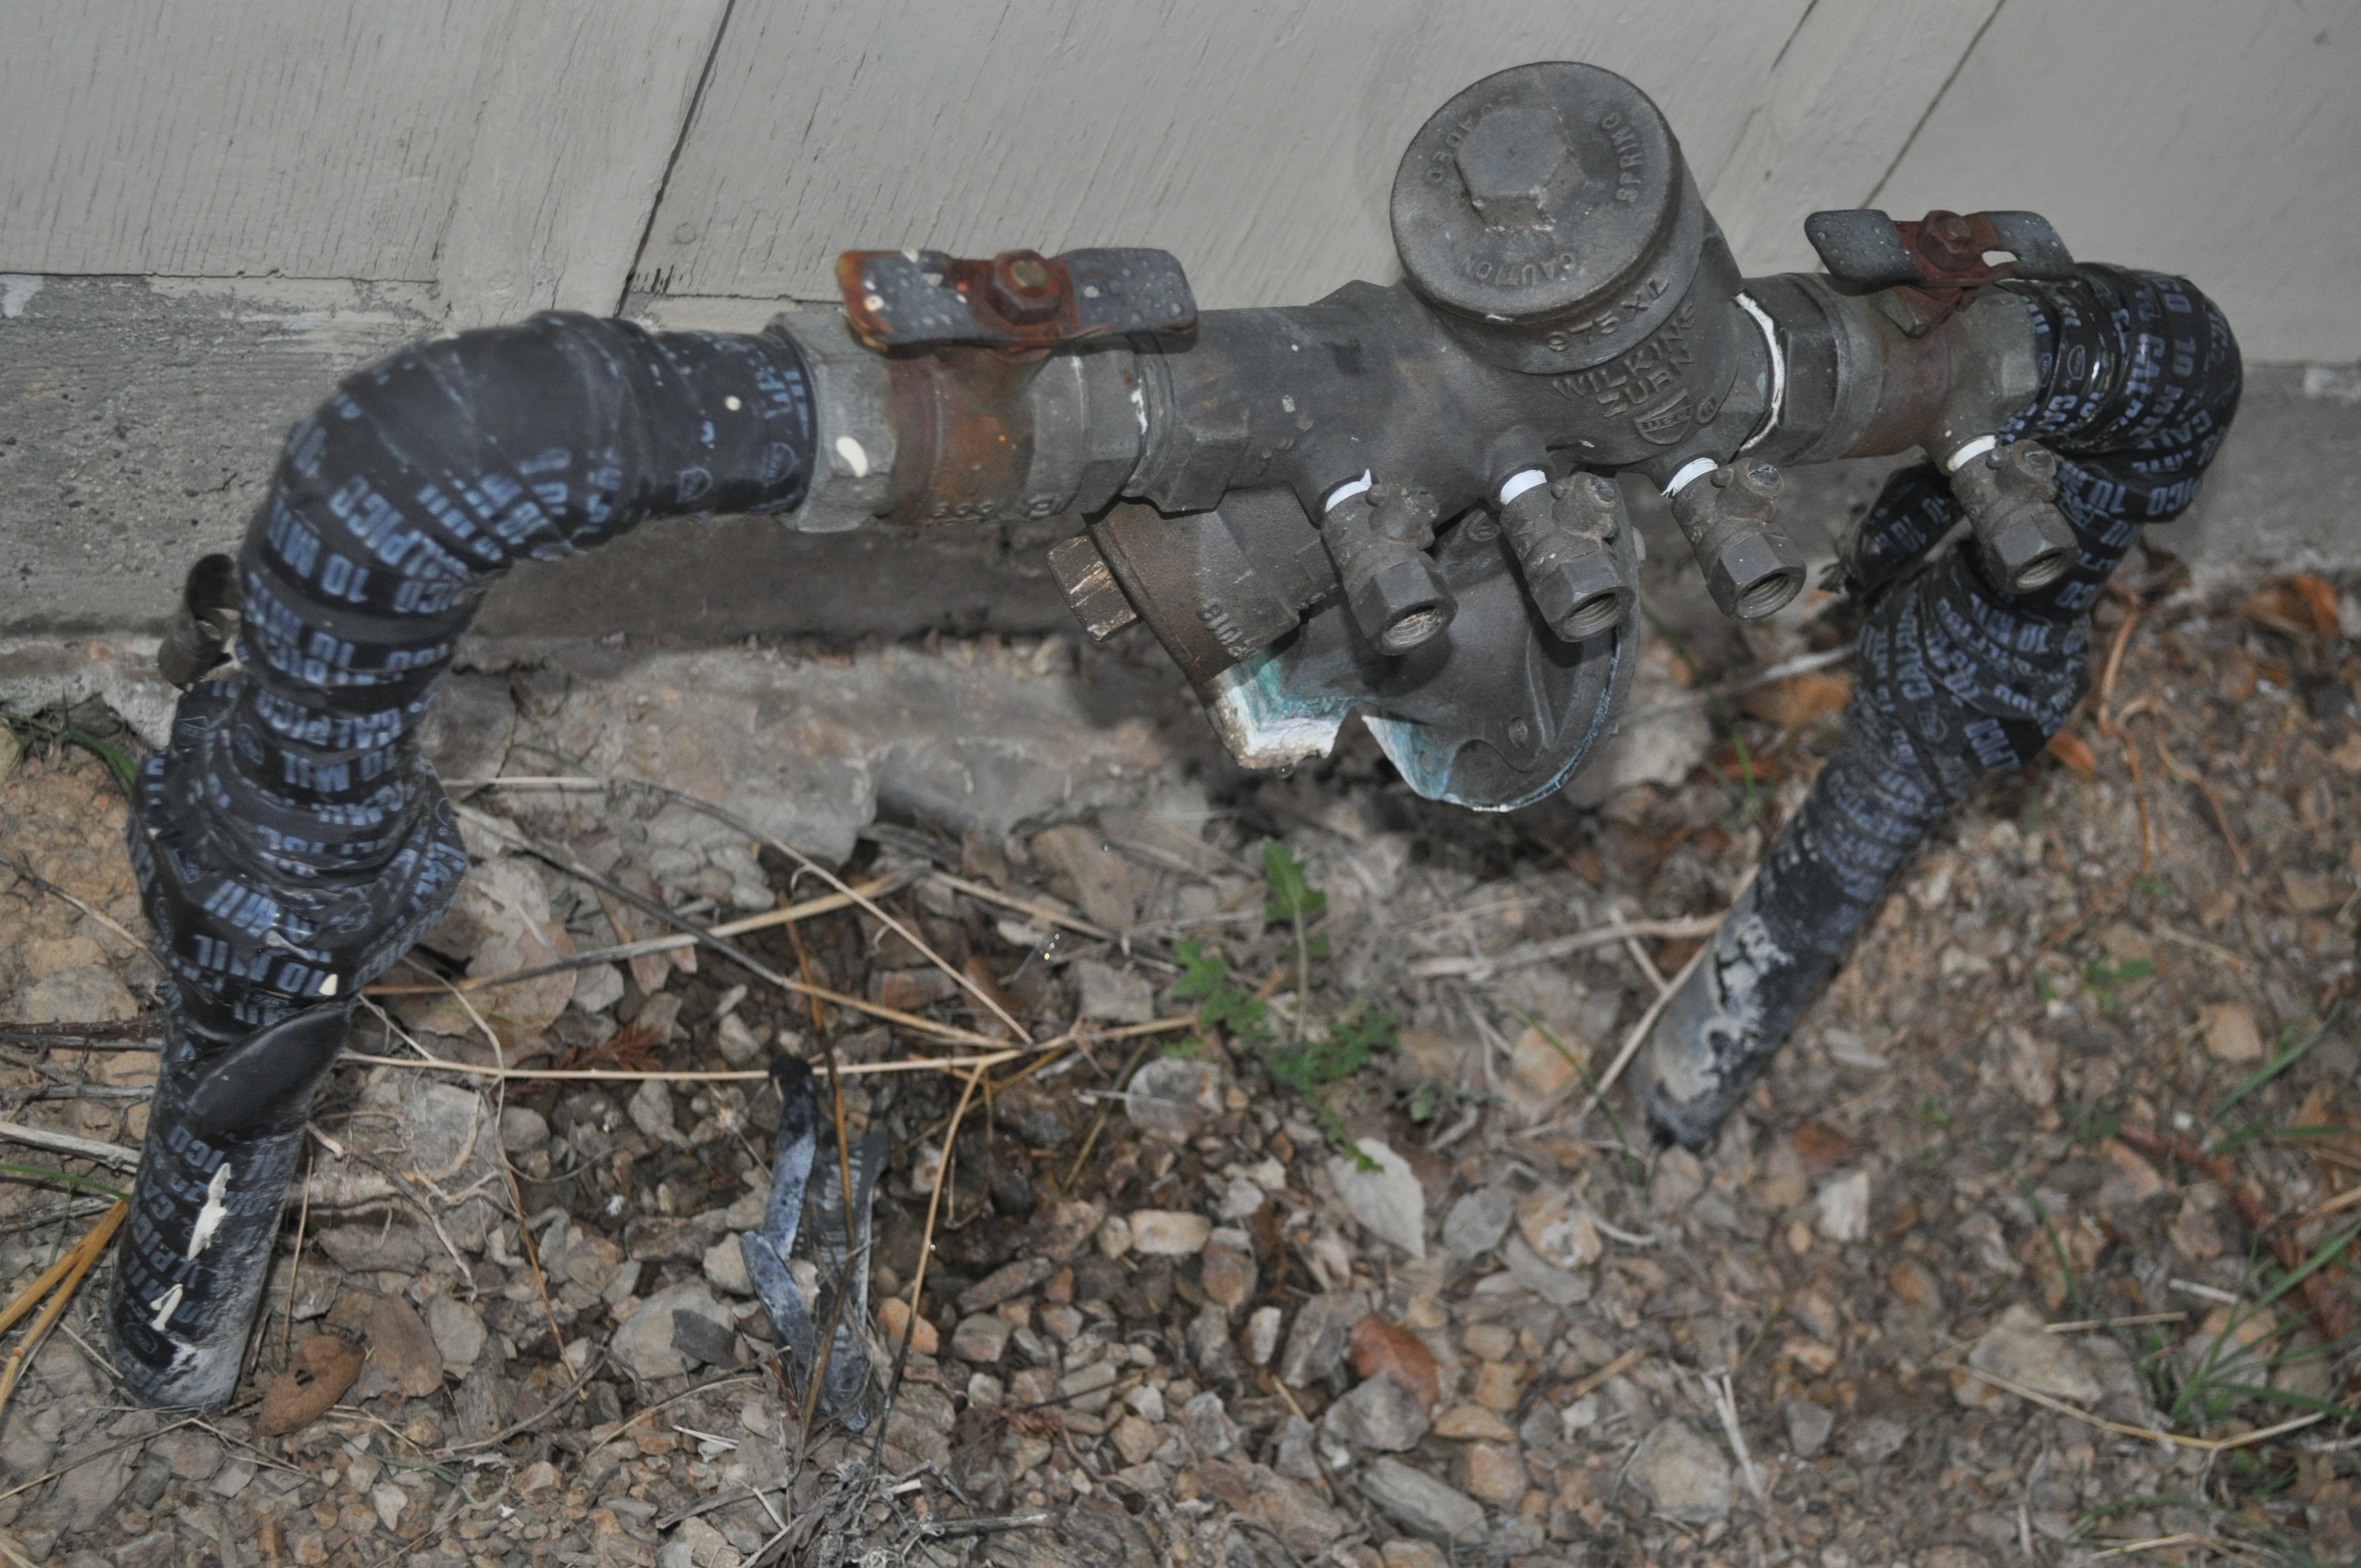
Below is a quick DIY with photographs for the $755 1-inch ID
Zurn Wilkins 975XL Reduced Pressure Principle Backflow Preventer
(http://www.zurn.com/Pages/ProductDetails.aspx?NodeKey=377206)
after detailing the 11-piece Wilkins Water Works RK34-975XL $43.20
repair kit (855-663-9876) and assembly instructions.

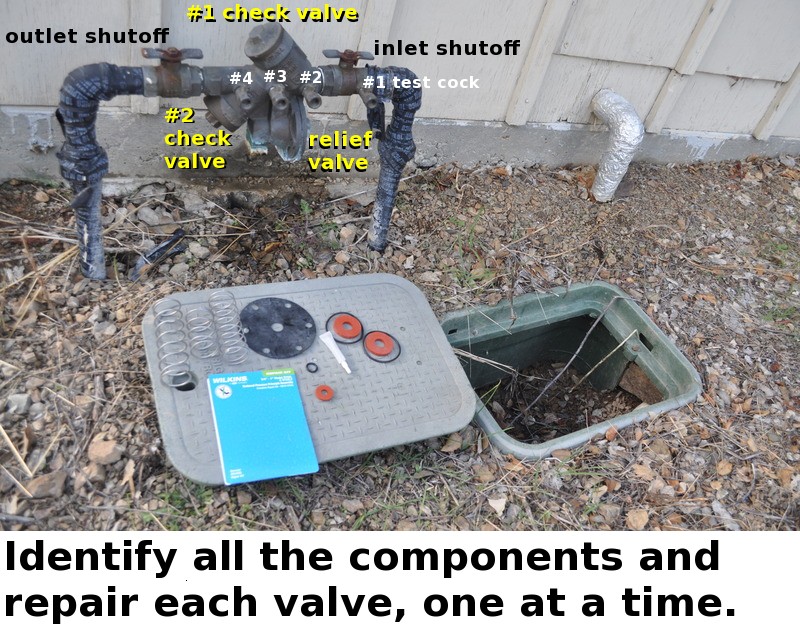
STEP 0 of 3: Shut inlet & outlet valves & open #2,#3,&#4 test ports
STEP 1 of 3: Repair #1 check valve on top inlet
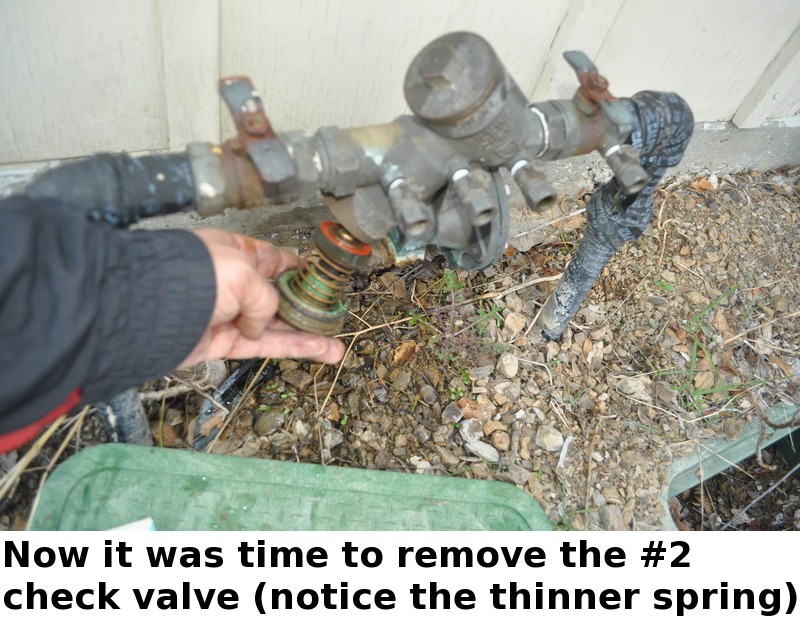
STEP 2 of 3: Repair #2 check valve on bottom outlet
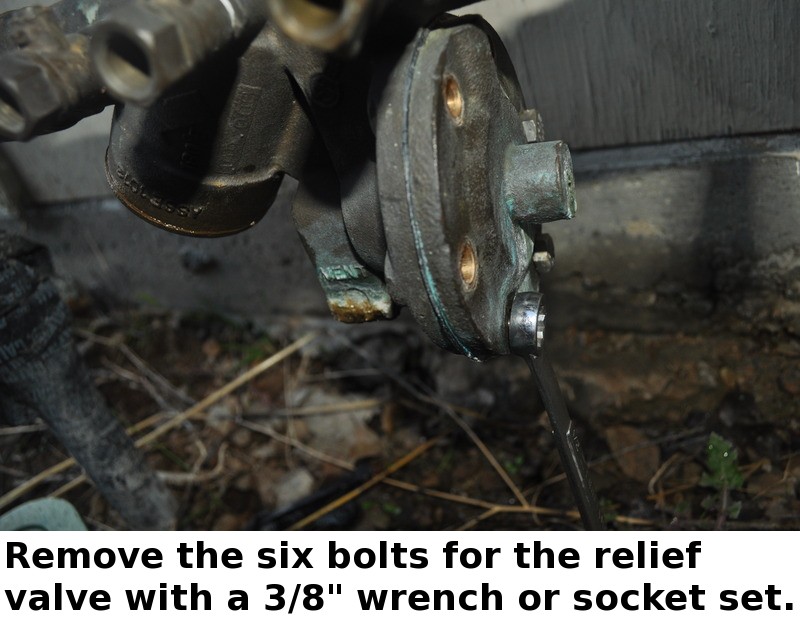
STEP 3 of 3: Repair relieve valve on side inlet

Here is a step-by-step DIY in 15 annotated photographs:
Loading Image...
Loading Image...
Loading Image...
Loading Image...
Loading Image...
Loading Image...
Loading Image...
Loading Image...
Loading Image...
Loading Image...
Loading Image...
Loading Image...
Loading Image...
Loading Image...
Loading Image...

REFERENCES:
Wilkins Zurn 975XL Specification Sheet
http://content.zurn.com/web_documents/pdfs/installation/ISSM950.pdf
http://content.zurn.com/web_documents/pdfs/specsheets/BF-975XL(lg).pdf

Wilkins Zurn 975XL Maintenance Sheet
http://content.zurn.com/web_documents/pdfs/installation/ISSM950.pdf
Loading...